Privacy statement: Your privacy is very important to Us. Our company promises not to disclose your personal information to any external company with out your explicit permission.
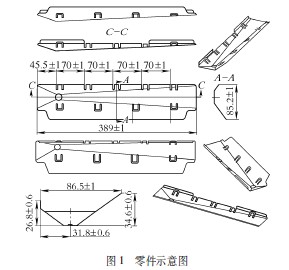
Figure 1 shows the water collecting plate for a refrigerator evaporator. The material is galvanized steel plate with a thickness of 0.3mm. The parts are large in production volume, complex in shape, and require no scratches on the appearance, no craters and no burrs.

Process analysis
As can be seen from the part drawing, the part is relatively thin and irregular in shape; the bottom of the drawing is not a flat surface, but a 2.6° slope with the horizontal plane; the height tolerance of the wings on both sides is ±0.6 mm, and the required width after forming is 86.5 ± 1 ) mm, there is a φ16mm hole at the bottom of the water collecting tray to facilitate the condensate outflow, because the hole is very thin at the near point of the bottom of the drawing, the mold material and heat treatment requirements are relatively high, not only in There are U-shaped holes on the inclined surface and also on the ribs, which brings great difficulties to the design of the mold and the preparation of the stamping process. Post-forming inspection measurements are very difficult and require a dedicated inspection tooling measurement. Since it is difficult to calculate the blanking size at one time, the pre-draw mold and the forming mold are first designed, and the blanking size is finally determined. After process analysis and verification, the stamping process is arranged as follows: shearing, pre-draw, trimming, forming and shaping (see Figure 2). Due to the impact of the rebound, it is necessary to add a shaping process after forming. The following describes the structure and precautions of the shaping mold.

2. Mold structure and working process
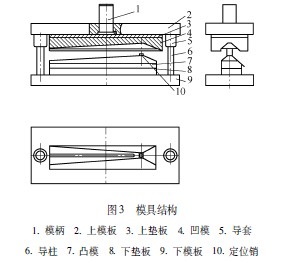
Figure 3 shows the shaping mold structure. The mold structure seems simple, and there are several points to consider:

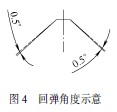
(1) The material used is relatively thin, and the rebound should be fully considered. The rebound angle is verified by two processes as shown in Fig. 4.

(2) In order to prevent scratching, the surface roughness of the mold cavity is required to be R a = 0.8 μm.
(3) The workpiece should be placed in a positive position, and the hole should be positioned to prevent heavy edge indentation.
(4) The convex and concave molds are all quenched by Crl2, and the hardness is 55~60HRC.
(5) The depth of the mold should be suitable, the low is not in place, and the embossing is deep.
The working process of the mold: placing the formed workpiece on the punch 7, positioning through the positioning pin 10, starting the press to lower the slider, and pressing the die 4 to press the workpiece. When the slider continues to descend, the die and the punch together The work is completed, the slider is ascending, the workpiece is placed on the protrusion, and the workpiece is taken out with the tweezers to complete a work cycle.
3. Conclusion
Due to the large batch size and high precision, after repeated verification, a qualified workpiece is produced. The process is feasible, the mold is reasonable, and 20,000 pieces have been produced, and the effect is very good.
E-mail naar dit bedrijf
January 13, 2022

Privacy statement: Your privacy is very important to Us. Our company promises not to disclose your personal information to any external company with out your explicit permission.

Fill in more information so that we can get in touch with you faster
Privacy statement: Your privacy is very important to Us. Our company promises not to disclose your personal information to any external company with out your explicit permission.